Chapter 2: Magento 2 – SEO Setup and Settings
The Guide:
- Chapter 1: Magento 2: What’s new for SEO?
- Chapter 2: Magento 2: SEO Setup & Settings
- Chapter 3: Magento 2: Advanced SEO Fixes
- Chapter 4: Magento 2: Google Analytics Setup
- Chapter 5: Magento 2: Extensions and downloads
- Chapter 6: Magento 2: Migration from Magento 1.9.x
- Chapter 7: Magento 2: Best Practices & Advanced Setup
- Chapter 8: Magento 2: Frequently Asked Questions
This Chapter:
- Canonical Catalogue Settings
- XML Sitemap
- Robots.txt file
- Removing index.php
- HTTP Compression and Caching
- Minify Javascript and CSS/HTML
- Page Titles and Meta Description
- Organization/Website Schema
Introduction
Setting up Magento 1.9.x was relatively routine. Magento 2 keeps it simple too – its basic SEO setup is as follows.
Note: Click on the icons to get extended information and the rationale behind each change or click here to show them all.
Canonical Catalogue Settings
Modern eCommerce platforms can create a significant quantity of duplicate content – and without proper configuration, Magento 2 is no exception.
Consequently, canonical URLs must be used to fix this.
Category Duplication
Near duplicates of category pages are largely created in Magento 2 by faceted navigation from attribute filters, the use of trailing slashes and product sorting options. This can result in URLs such as:
- http://www.example.com/chocolates/?product_list_limit=30
- http://www.example.com/chocolates/?product_list_order=name
- http://www.example.com/chocolates
- http://www.example.com/chocolates/
- http://www.example.com/chocolates?ingredients=5
Product Duplication
For products, it is slightly more simple. The various categories that products are associated with (and trailing slashes) can contribute to the same product appearing at different URLs. This can result in the following:
- http://www.example.com/chocolates/mars-bar-84g
- http://www.example.com/chocolates/bars/mars-bar-84g/
- http://www.example.com/mars-bar-84g
- http://www.example.com/mars-bar-84g/
- http://www.example.com/brands/mars/mars-bar-84g
Checking for this
A quick way to check for the category or product duplication is to use Google itself.
Using search operators such as site:, inurl: and intitle: together will usually uncover instances of such duplication, e.g. site:.co.uk inurl:air-wick intitle:”Air Wick Mrs Claus Apple Pie”. You can use these search operators using titles from a random product, category or CMS page / blog post.

Note: You will not need to test every page like this, just two or three of each page type.
The Solution
This may be considered duplicate content. Adding a canonical link for products and categories indicates to Google which of the multiple URLs that the categories and products can be accessed at is the correct or ‘main’ URL that you would like to rank.
This can be resolved quite easily with some configuration settings. The way this works is nearly identical to Magento 1.9.x.

Setting up Canonical URLs:
- Search Engine Optimization settings for categories and products can be accessed via: Stores & Settings / Configuration >; Catalog > Catalog Actions;
- Canonical links enabled on both products and categories.
- Product URLs not using category path.
- And Product URL / Category URL suffix set as / (unless something like .html is preferred).
- If this is changed, this will not be updated unless the index is rebuilt (System > Tools / Index Management) and the cache is cleared (System > Tools / Cache Management).
- A trailing slash is recommended because redirects can be implemented to force non-files to have a trailing slash with a small modification to the server. This is described below.
There are some small disadvantages to using some of these settings (specifically losing the category from the URL and how Magento handles breadcrumbs), but these are outweighed by the benefits.
Enabling canonical CMS pages needs a third party extension and is described in the next chapter.
If the product URL and Category URL Suffix is set as a trailing slash, a good modification is to force your site to redirect from example.com/category to example.com/category/. In Magento 1.9.x, this could be actioned as a setting in the Creare SEO extension. But (at the time of writing) this is not yet available for Magento 2.x. A small modification will need to be made to your webserver.
Apache Forced Trailing Slash
If you have an Apache server, then this requires modification of the htaccess file. A solution from StackOverflow can be made to work for Magento 2.x.
The following should be added to the htaccess file. It should be placed after any RewriteBase (if necessary) but before the RewriteRule citing index.php:
RewriteCond %{REQUEST_URI} !(.*)/$
RewriteCond %{REQUEST_FILENAME} !-f
RewriteCond %{REQUEST_URI} !^index.php
RewriteCond %{REQUEST_URI} !\.(html|jpg|png|gif)$
RewriteRule ^(.*)$ $1/ [L,R=301]
It is placed after any RewriteBase (if necessary) but before the RewriteRule citing index.php.
Nginx Forced Trailing Slash
If you have an Nginx server, an update to Nginx configuration file will be needed.
location / {
rewrite ^([^.]*[^/])$ $1/ permanent;
}
Note: Any redirect changes should be thoroughly tested after their implementation – including a check for retention of query strings. Any existing rules and the correct order of rules can affect this, so be wary of them.
XML Sitemap
XML sitemaps allow Google to identify and crawl the URLs on your site easily and they are still a core feature in Magento 2. They are not mandatory for search engines to be able to crawl your website, but they are highly recommended, as they go a long way in making this easier for search engines.
One notable improvement in Magento 2 is the ability to split your sitemap into multiple files – the general recommendation is to keep each XML file under 50,000 URLs.
A second minor improvement is the ability to add the URLs for the sitemaps to the robots.txt file (within the Search Engine Submission Settings) – this is a small quality of life improvement and one that has often been neglected by site owners.
There is still no out of the box support for Hreflang XML sitemaps for those running international/multi-language sites. This is a real shame considering how effective Magento is at implementing these via multi-store front installations. This is discussed in the next chapter.
HTML Sitemaps are no longer part of Magento Core but can easily be re-implemented via a template or third party extension.
This can be accessed via: Stores > Settings / Configuration > Catalog > XML Sitemap.
Enabling daily generation is the best practice but this will vary. In practice, this puts a small load on the server when there are thousands of products.

The default sitemap settings for categories, products and CMS page options are fine. Google tends to determine crawl priority itself – any settings you choose in the sitemap will only be used as a guide.

Note: Any sitemaps that are generated should be immediately submitted to Google Search Console to aid indexation of all your pages.
Sitemap URL and Location
Ideally the sitemap URL should be /sitemap.xml. but you can set this to whatever you’d like. It is important to keep the Path setting to /pub/ otherwise the sitemap will not be found in the route.

Robots.txt file
The robots.txt file is a “text file webmasters create to instruct […] search engine robots […] how to crawl and index pages on their website”.
As mentioned above, Magento 2 adds the ability to edit the robots.txt file from the admin backend:
Stores > Configuration > Design / Search Engine Robots.

In October 2014, Google updated their guidelines to tell web developers to ensure that their robots.txt file does not block images, fonts, Javascript, CSS or any other files that influence how the page looks when it is rendered.
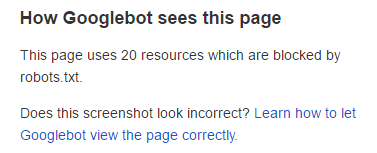
If you would like to check whether your existing robots.txt file does this, there is a robots.txt checker built into Google Search Console, but a quick test is Google’s Mobile-Friendly checker.
Since this change, the configuration of the robots.txt file has become a lot less important on Magento sites – with the exception of blocking query strings and other junk URLs (e.g. add to wishlist, send to a friend). However, this situation changes substantially when certain extensions are used – specifically those that create (so-called) “SEO pages” for attributes. When this happens, your robots.txt file becomes one of the main things stopping your site from having more pages than Amazon. Ensure your robots.txt file is always kept up to date for this reason.
Robots.txt for Staging Sites
Our recommended setting is:
Disallow: /
This blocks every URL on the site. This is useful on staging sites but should never be used on live sites, as it will prevent search engines from crawling any page – although it is a reasonable way of dealing with duplicate “Trade” sites.
Robots.txt for Live Sites
If you are looking for an off-the-shelf robots.txt file, Creare’s Magento 1.x robot.txt file is pretty good but;
- Lines 45-60 should be dealt with in other methods (no-indexing, no-following) or are not needed any more (although it should not cause any harm).
- Line 79 (URLs with query strings) will need to be reviewed.
Blocking URLs with query strings from Google
On a Magento site, URLs with query strings are often duplicates of page categories or just non-indexable pages that do not need to be crawled. The above robots.txt file does not block URLs with query strings (line 79) because it is “commented out” – there is a # in front of it. To enable this, line 79 must have the hash removed.
However, whether or not you should depends on several factors
- If the site has already allowed URLs with parameters to be indexed previously, blocking them will prevent GoogleBot from recrawling them and these pages will stay indexed.
- If these pages have noindex added to them (discussed next chapter), these pages will be eventually removed (typically 1-2 months later). After this has happened, it is perfectly fine to block URLs with query strings from Google.
- However, if there are no plans to noindex URLs with query strings, line 79 can be uncommented (remove the #) to stop unnecessary pages from being crawled. This simply prevents new variations from being indexed, and prevents unnecessary pages from being crawled.
- If the site is fresh, line 79 can be uncommented without issue.
Verifying Your Robots.txt
Our recommendation is to use a tool such as Screaming Frog to crawl your site to see if any pages are being picked up that should not be. For example, hundreds of URLs containing “wishlist” might be a cause for concern as these are pages you typically do not want to be indexed.
These URLs can safely be added to the robots.txt file. Failing that, our Magento 2 Robots.txt fork is a good building block.
Note: If your site is set up on GitHub or similar version control, it is probably a bad idea to update the robots.txt file via the Magento backend since this can be overwritten. This should instead be updated from within your version control.
Search Engine Robots
While you are on this screen checking your robots.txt…
Stores > Settings / Configuration > General / Design
… it is also a good idea to check Search Engine Robots. This is so we can verify that your storefront is set as INDEX, FOLLOW to ensure that your site is not blocking Google from accessing your site.
Search Engine Robots relates to a tag that can be added to a page that prevents Google from indexing the site. This is useful for staging sites, less useful for sites that you want to be indexed.
The Default Robots options are as follows, so make sure you choose the correct option for your website:
| INDEX, FOLLOW | Instructs web crawlers to index the site and to check back later for changes. |
| NOINDEX, FOLLOW | Instructs web crawlers to avoid indexing the site, but to check back later for changes. |
| INDEX, NOFOLLOW | Instructs web crawlers to index the site once, but not to check back later for changes. |
| NOINDEX, NOFOLLOW | Instructs web crawlers to avoid indexing the site, and to not check back later for changes. |
Removing index.php
By default, Magento 2 and 1.9.x URLs look something like http://magento2.pushonltd.co.uk/index.php/viktor-lumatech-trade-pant.html.
Removing the “index.php” from the URL should also be on your setup checklist, as this is a common cause of duplicate content.

To do so, navigate to:
- Stores > Settings / Configuration > General / Web > Search Engine Optimisation
- Enable Use Web Server Rewrites.
As long as the htaccess file is set up (Apache) and the configuration file (Nginx), then index.php will be stripped from the URLs.
To check they are in place, look for / add the following lines:
Apache
This should be added to the htaccess file if not already present:
RewriteRule .* index.php [L]
Nginx
This should be added to the configuration file if not already present:
location / {
try_files $uri $uri/ /index.php?$args;
}
Non-WWW / WWW Redirects
Whilst you’re on this screen, change the Auto-redirect to Base URL to 301 Redirect in Url Options.
Your site usually exists at example.com and www.example.com. Usually, the Base URL will be set to one or the other and will redirect to the preferred site.
However, by default, this is set to a 302 redirect and historically this was a bad thing because 302 redirects are known as a temporary redirect and were believed to not pass link equity / authority. Google recently debunked this, but there is still strong evidence to suggest that 301 redirects retain more link equity. So we still recommend 301 redirects for now.
HTTP Compression and Caching
Users demand fast loading sites – and so does Google. It is believed to be beneficial to ensure that your website loads in under three seconds.
There are two effective ways to help do this:
- Gzip compression of static files (HTML, JS, CSS) reduces the download time for your website and can improve page load time.
- Caching of static resources (template files, images, JS, CSS) ensures that the same files are not downloaded twice – reducing strain on your webserver and improving page load time for users.
You cannot set this up via the Magento backend, you will need to update this via your web server settings.
Magento 2 Apache Settings
If your web server is running Apache, you will need to update your htaccess file.
Most of the Creare Magento 1.x htaccess file is fine to build from, but we have forked the file for Magento 2. This is a partial file, so will need integrating into your main htaccess file – individual sections can be copied and pasted into it.
Useful sections include;
- Lines 28-40 and 70-92 setup gzip compression via mod_deflate.
- This typically outperforms mod_gzip (lines 97-106).
- Line 35 (1 php_flag zlib.output_compression on) can sometimes generate server errors if added to a server without gzip output enabled in PHP. If this occurs, this line can be safely removed.
- Lines 112-122 setup caching of certain filetypes via mod_expires – and does it slightly better than the default htaccess supplied with Magento 2.
The rest of the file is optional. For example, it implements ETags (lines 49-52) – this is a different and complementary way to handle caching, but it can cause issues with some configurations.
Magento 2 Nginx Settings
PushON’s recommendation for Magento hosting is Nginx. It offers some improvements with respect to latency and dealing with concurrent connections.
HTTP Compression and Caching can be set up for Nginx too and this involves updating the conf file for the site. The one supplied by Magento works fine and has most things properly set up.
Testing Caching / Compression
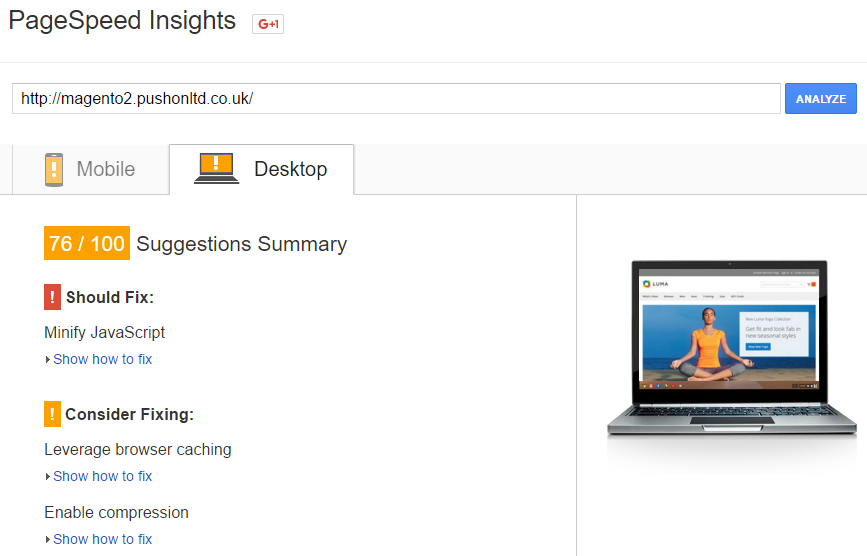
Be sure to test your site using Google’s PageSpeed Insights Tool to ensure everything is working correctly. This also checks whether or not minify is working.
Note: You will not be able to enable caching or compression for third party scripts that are hosted off-site – e.g. Google Analytics, Facebook share buttons. Caching is only possible for internal resources
Minify Javascript and CSS / HTML
Minify is a great way of improving page load speeds simply by combining scripts.
Modern browsers can download 6-8 files simultaneously from a server, including images, scripts and JS. A page may have between 120 and 200 files. This is why PushON recommends the use of sub-domains or external providers for a CDN (content delivery network – a large network of globally distributed servers).
Using a media, theme and scripts sub-domain (e.g. media.example.com, skin.example.com, js.example.com) will quadruple the number of files that are downloaded simultaneously – increasing page load speed substantially. This topic is covered in more detail in the upcoming advanced configuration chapter.
Minify picks up on this by combining script/CSS files, reducing both the download time and the render time – each individual JS/CSS file loaded triggers or delays a new page render.
As mentioned in the previous chapter, this functionality has been improved in Magento 2. We now have three options plus bundling.
- Merge JS and CSS files without minifying. This is slightly more likely to cause issues but reduces page load times by reducing the number of render passes and file downloads.
- Minify JS and CSS files. This simply removes excess carriage returns and whitespaces from the files. It reduces the file size by a small amount (small relative to the total web page size) but does not really have the same benefits as the above.
- Both of the above.
Enabling Minification

To set this up, navigate to
- Stores > Settings / Configuration > Advanced / Developer and;
- To enable HTML minification, enable Minify HTML in Template Settings.
- To enable Javascript minification or merging, navigate to JavaScript Settings.
- And for CSS merge and minify, navigate to CSS Settings/
Warning: JavaScript Minify is an easy way to break a website. Minify should never be tested in a live environment and certainly not without testing all forms, add to basket and a complete transaction. It should also be tested using more than one browser.
Bundling
The last option is bundling. Another new feature in Magento 2 core is RequireJS which programmatically loads JavaScript files.
Since Magento 2’s file merging and minification only applies to assets included via layouts, files loaded by RequireJS won’t be included in this process. That is where bundling comes in.
It needs an additional configuration which is outside the scope of the basic setup, but it will result in improved page load and render times if setup.
Page Titles and Meta Description
Setting page titles in Magento 2 comes in 2 stages.
Individual pages can easily have their metadata updated by selecting the appropriate page for that storefront. For example, to update the homepage meta description and title, you must edit those fields on the CMS page associated with the homepage.

But you also need to specify boilerplate brand title text.

- Navigate to: Stores > Settings / Configuration > General / Design > HTML Head.
- Title Suffix or Title Prefix allows you to add the name of your store to every page.
A common question we see is “Do you need to add your brand name to your website title?” In short, yes.
Google will mostly add it to the displayed title in the Search Engine results page anyway, so you should add a version of it yourself. This at least gives you control over how it is displayed.
Setting Product Default Templates
A good new feature in Magento 2 is being able to use product attributes in the metadata – in fact, a default template can easily be defined for products.
The default meta description is only used on products and only when a specific meta description is not set. It defaults to product name and product description.
To override the default, navigate to:
- Stores > Settings / Configuration > Catalog / Catalog > Product Field Auto-Generation.
Using a “mask for meta description” (default) such as “Buy {{name}} from Example.com. Available now for {{price}} with free delivery for orders over £20”, will populate with the appropriate product name and price. Any defined attribute associated with that product can be used and will be automatically populated.
It is not necessary to use the “meta keywords” tag, but it can be helpful to populate this with non-visible attributes if you use Google Tag Manager, e.g. SKU, colour, manufacturer. This data can then be pulled by GTM into Google Analytics for custom dimensions. For example, on a children’s clothing website, you could use age group – this would allow segments to be built to analyse conversion rate for all baby clothes vs infant clothing.

Note: Meta descriptions are not believed to be a ranking factor for Google; they are just persuasive text to encourage people to click through to your site from the search results.
Organisation / Website Schema
Organization / LocalBusiness Schema is especially helpful for businesses with a physical location. Adding this markup to the site can help get data pulled into the Google Knowledge Graph in search.

WebSite Schema can also help Google identify and use your site’s internal search engine.
Creating the snippets is relatively easy using a JSON-LD Structured Data Generator.
An example snippet is below for reference. This example defines a website with multiple locations, their opening times, phone numbers and the internal search engine used by the site.
It’s a good idea to test any code via Google’s Structured Data Testing Tool.
<script type="application/ld+json">
  [{
    "@context": "http://schema.org",
    "@type": "WebSite",
    "about": "Travelling Man",
    "url": "http://www.travellingman.co.uk",
    "potentialAction": {
      "@type": "SearchAction",
      "target": "http://www.travellingman.co.uk/catalogsearch/result?q={query}&x=0&y=0",
      "query-input": "required name=query"
    }
  }, {
    "@context": "http://schema.org",
    "@type": "Organization",
    "url": "http://www.travellingman.co.uk",
    "name": "Travelling Man",
    "logo": "http://www.travellingman.co.uk/skin/frontend/default/travellingman/images/logo.png",
    "subOrganization": [{
      "@context": "http://schema.org",
      "@type": "LocalBusiness",
      "address": {
        "@type": "PostalAddress",
        "postalCode": "M1 1JW",
        "streetAddress": "4 Dale Street",
        "addressLocality": "Manchester",
        "addressCountry": "GB"
      },
      "email": "manchester@travellingman.com",
      "name": "Travelling Man - Manchester",
      "parentOrganization": "Travelling Man",
      "telephone": "0161 237 1877",
      "url": "http://www.travellingman.co.uk/our-stores/manchester",
      "openingHours": ["Mo-Sa 10:00-18:00", "Su 11:00-16:30"]
    }, {
      "@context": "http://schema.org",
      "@type": "LocalBusiness",
      "address": {
        "@type": "PostalAddress",
        "streetAddress": "32 Central Road",
        "addressLocality": "Leeds",
        "postalCode": "LS1 6DE",
        "addressCountry": "GB"
      },
      "email": "info@travellingman.com",
      "name": "Travelling Man - Leeds",
      "parentOrganization": "Travelling Man",
      "telephone": "0113 243 6461",
      "url": "http://www.travellingman.co.uk/our-stores/leeds",
      "openingHours": ["Mo-Sa 10:00-18:00", "Su 11:00-17:00"]
    }, {
      "@context": "http://schema.org",
      "@type": "LocalBusiness",
      "address": {
        "@type": "PostalAddress",
        "addressLocality": "York",
        "postalCode": "YO1 7LF",
        "streetAddress": "54 Goodramgate",
        "addressCountry": "GB"
      },
      "email": "info@travellingman.com",
      "name": "Travelling Man - York",
      "parentOrganization": "Travelling Man",
      "telephone": "01904 628 787",
      "url": "http://www.travellingman.co.uk/our-stores/york",
      "openingHours": ["Mo-Sa 10:00-18:00", "Su 11:00-17:00"]
    }, {
      "@context": "http://schema.org",
      "@type": "LocalBusiness",
      "address": {
        "@type": "PostalAddress",
        "streetAddress": "43 Grainger Street",
        "addressLocality": "Newcastle-upon-Tyne",
        "postalCode": "NE1 5JE",
        "addressCountry": "GB"
      },
      "email": "info@travellingman.com",
      "name": "Travelling Man - Newcastle",
      "parentOrganization": "Travelling Man",
      "telephone": "0191 261 4993",
      "url": "http://www.travellingman.co.uk/our-stores/newcastle",
      "openingHours": ["Mo-Sa 10:00-18:00", "Su 11:00-16:30"]
    }],
    "sameAs": ["https://www.facebook.com/TravellingManShops", "https://twitter.com/TravellingManUK", "https://instagram.com/travellingmanuk/"]
   }]
</script>
Adding Organisation / WebSite Schema
The code for your website can easily be pasted into the HTML head of the website via:
Stores > Settings / Configuration > General / Design > HTML Head.

Google Analytics
As the last step, Google Analytics will need to be set up. This is covered in greater detail in chapter 4.
Keep reading to discover more about Magento 2’s Advanced SEO Fixes.

